There are two widely available motor kits, the economy one at about £30 with limited controls, and a multi-speed option with a controller on the end of a cable costing about £60. I opted for the cheap option - although I am already beginning to wonder if this was a false economy? The controls seem a bit fiddly for cold fingers. (Update - I did opt for the upgrade.)
The aim of this blog post is to detail installing the economy EQ2 motor, since the supplied single sheet of instructions omits a lot of details.
 |  |
| The box and its contents | The provided instructions |
The instructions fail to explain how to fit the battery, or even what kind of battery. It transpires the two round unlabelled knobs on the front of the control panel are screws, and allow you take the case cover off. I could guess from the shape that a standard E-Block / 6LR61 / MN1604 / PP3 9V battery was expected, which is actually stated on some retailers' websites. It is a tight fit to squeeze it into the padded niche between the PCB and the motor:
 |  |
| Simple EQ2 motor with case off | With 9V battery fitted |
Once the battery is fitted, you can test it works before mounting it. Flicking the power switch on you should hear the motor whining, twiddle the speed adjustment or toggle direction (the North/South switch) and the pitch changes. If you look carefully at the black rubbery drive attachment it should be turning, but very slowly. So slowly in fact that for a while I wondered if mine might be broken - but after all, the Earth only spins 15 degrees an hour.
As the minimal instructions explain, you must remove the RA control cable, exposing the shaft, and undo the nearby screw with the allen key provided - both highlighted in red in the photo below. Then the motor's black rubbery drive attachment goes onto the shaft, while the screw threads through the metal bracket.
 |  |
| Screw and shaft for mounting the motor | EQ2 motor mounted |
Here is the view from underneath, showing the motor's black rubbery drive attachment connected to the worm gear shaft that controls the ascension - you'll want a flat head screwdriver to tighten the set screw (or relax it if you need to disengage the motor, for example if you have a flat battery).
 |  |
| Drive coupling, set screw marked in red | Motor on. The labels are now upside down, sloppy! |
All installed and apparently working - all I need now is an evening with clear sky to test it out, get used to the new controls. Big thanks to the friendly folk at AstronomyForum.net for helping me out.
Post testing conclusions
Good thing I stayed up late tonight, the cloud cleared up and I could try tracking the moon. Jupiter wasn't out tonight (which I've previously admired pre-motor), but I was able to find Mars (or at least, a little red dot in about the right place), and then Saturn (after relocating to avoid a tree). I can't have had my polar alignment quite right, but the motorised ascension still helped. Saturn's rings looked pretty good to my novice eyes - and was worth the cold toes!
Getting the find motor control speed just right takes some fiddling, but it makes the telescope so much easier to use at high magnification. It also means you can line up a nice view, hand over to someone else for a look, and expect the object to still be there when they're done. More importantly perhaps, it makes longer exposure photography possible.
Since the RA control rod has been replaced, for fine ascension control you can use the economy motor's fine speed control. However, once you've got the motor speed just right for sidereal tracking (or tracking the moon or a planet), you don't really want to change it, so this single speed motor isn't ideal. Turning the motor off, or flicking the North/South toggle lets you go forward quickly with respect to the Earth's rotation - but there is not really a satisfactory way to move against the rotation.For large ascension control, just loosen the control circled below which disengages the worm thread used by the motor (or the RA control rod). Apparently this is called the RA clutch (there is a matching one further up for the Dec control). Maybe my scope isn't balanced quite right, but I found trying to make small adjustments this way very tricky.
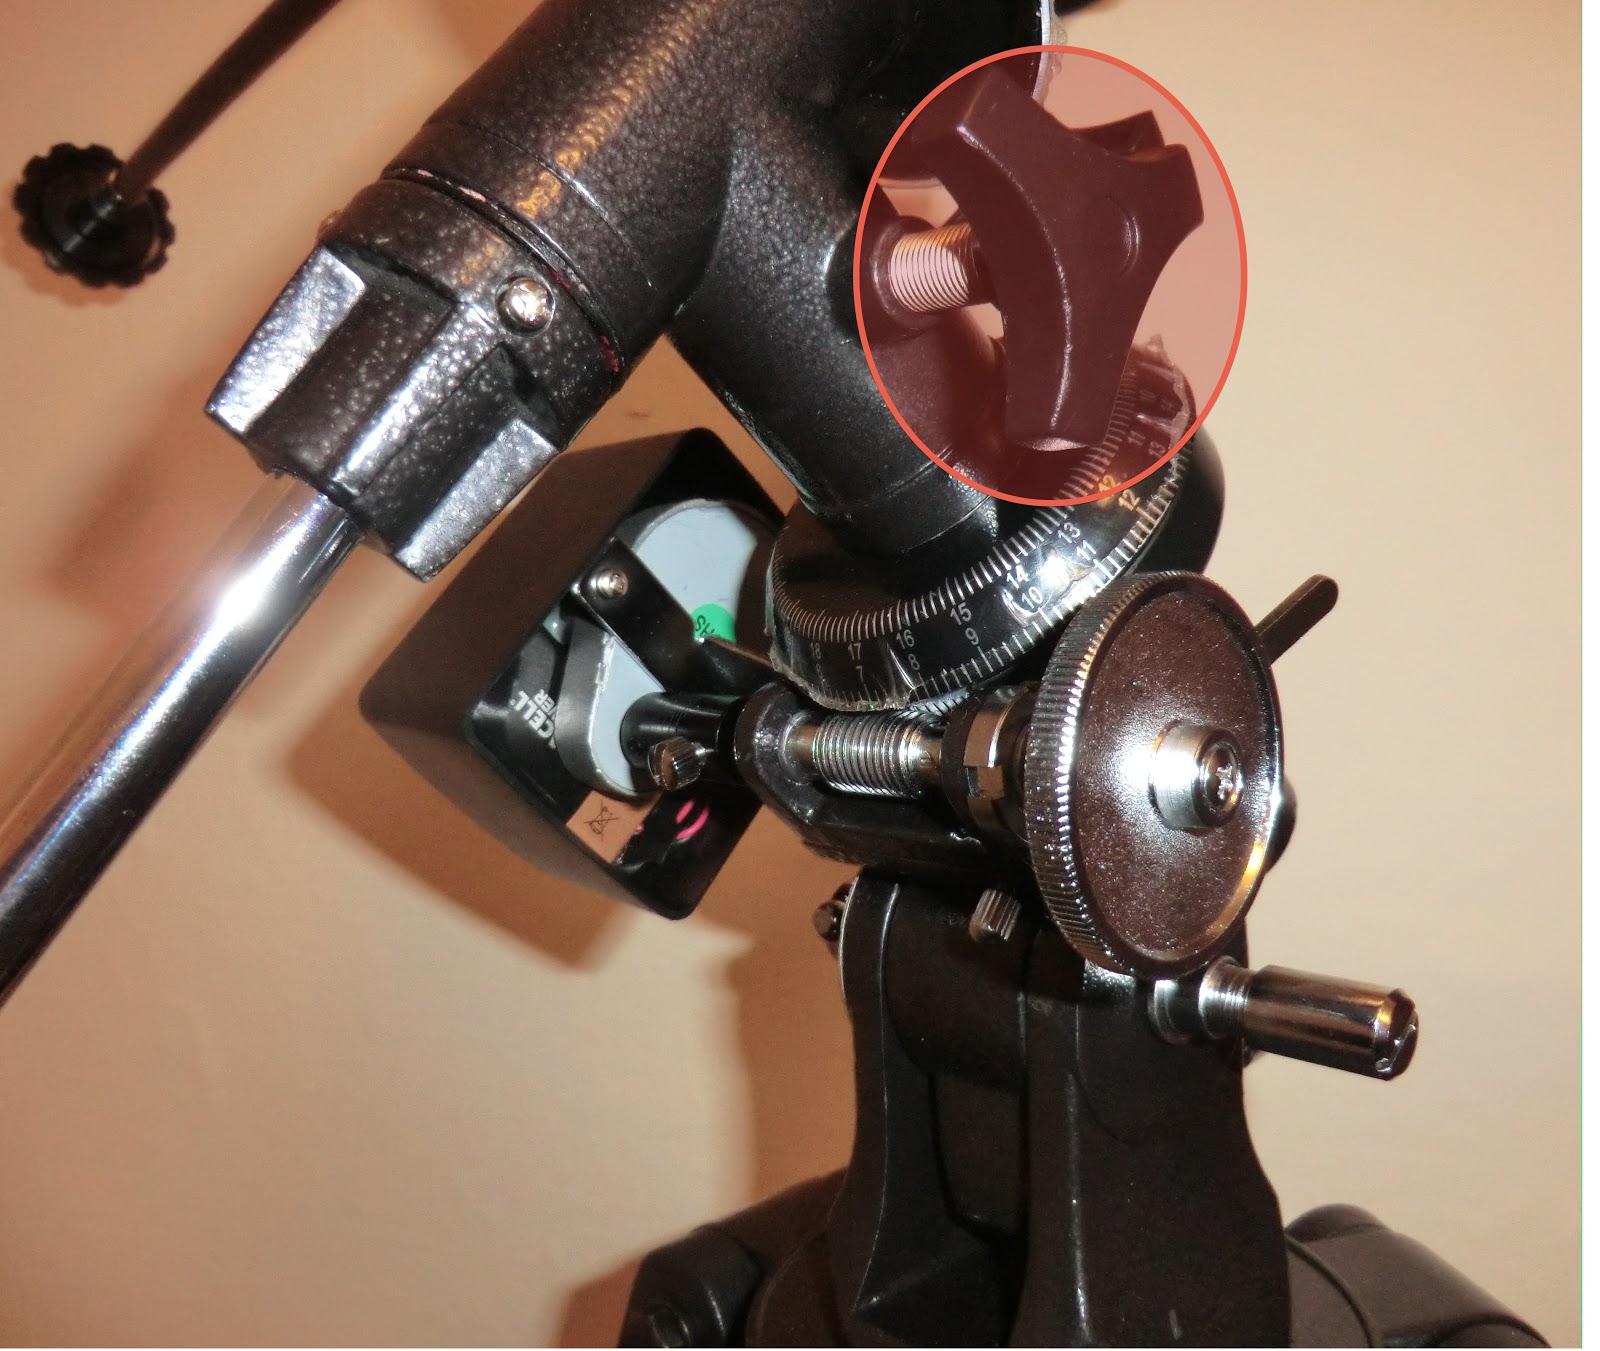 |
| Loosen this EQ2 knob (or clutch) for free RA control |
If you are willing to live with the fine RA control limitations, these single speed motors are still a very useful upgrade to the basic SkyWatcher EQ2 mount. In fact, I suspect you could modify one with a switch toggling between the variable resistor (connected to the fine speed control), and one or two fixed resistors - turning it into a simple multi-speed motor.
However, really missing the fine RA control, I decided upgrade to the more expensive multi-speed EQ-2 motor kit after all.
That's a very informative article. I've got an old telescope with a very similar (but not identical) mount to the EQ2. I'm pretty fed up fiddling with the RA knob all the time. I think I'll get one of these motors and try to gerry rig it up.
ReplyDeleteDid you switch the £60 version in the end?
Yeah, I did upgrade - I guess it wasn't clear enough but the last line of the post linked to the follow on where I got the multi-speed motor. I've tried to clarify this now. Luckily the retailed I got this from was happy to take the original motor back.
Deletehttp://astrobeano.blogspot.com/2012/01/multi-speed-motor-for-skywatcher-eq2.html
I know this is an old post but I got this motor and tested it last night, skies were OK for a while then went foggy... I could still see Jupiter but getting the right speed on this thing was next to impossible!!!! It either went to fast or to slow :(
ReplyDeleteYeah, I found the controls very fiddly. It was fine for countering the Earth's rotation (tracking the stars once you have your Polar alignment done), but is not a good choice for changing the view point. That's why I upgraded almost immediately.
DeleteThanks for the detailed info. Is the motor a simple DC motor or a Stepper?
ReplyDeleteI don't know for sure, and since I returned it I can't try looking for any clues on the circuit board.
Delete